
Welcome to the ultimate guide for harnessing the power of Windows Subsystem for Linux 2 (WSL2)! In this guide, I’ll walk you through everything you need to effortlessly run Linux on your Windows machine. Whether you’re interested in popular distributions like Ubuntu, Kali Linux, or Debian, or you want to leverage complete GUI and GPU support, this guide has you covered. Let’s dive in!
Introduction
Windows Subsystem for Linux 2 (WSL2) is a powerful tool for developers and IT professionals who need to run a Linux environment directly on a Windows machine. It offers improved performance and greater compatibility compared to its predecessor, WSL1, and allows you to seamlessly integrate Linux tools into your Windows workflow. In this article, we’ll walk you through the steps to install and set up WSL2 and Linux on your Windows 10 or Windows 11 system.
What is WSL2?
WSL2 is an updated version of the Windows Subsystem for Linux that includes a full Linux kernel running in a lightweight virtual machine. This means you can run a genuine Linux kernel and execute Linux binaries natively on Windows. WSL2 improves file system performance, supports a wider range of applications, and provides better compatibility with Linux software.
Advantages of WSL Over Traditional Virtual Environments
Performance and Resource Efficiency:
- Lower Overhead: WSL, especially WSL2, uses fewer resources than full virtual machines.
- Faster Startup: WSL starts almost instantly, unlike traditional VMs that take longer to boot.
Seamless Integration with Windows:
- File System Access: Direct access to Windows files via
\\wsl$, unlike shared folders in VMs. - Command-Line Integration: Run Linux commands directly from Windows Command Prompt or PowerShell using
wsl.
- File System Access: Direct access to Windows files via
Ease of Use and Setup:
- Simpler Installation: Easy setup through Windows, without the need for separate VM software.
- Less Maintenance: Managed through Windows updates, unlike VMs which need separate management.
Networking and File System Performance:
- Better Performance: WSL offers superior file I/O and network integration compared to traditional VMs.
Cost and Licensing:
- Free and Included: WSL comes with Windows at no extra cost, while traditional VMs may require additional licenses.
Security and Updates:
- Unified Security: Benefits from Windows’ integrated update and security mechanisms, unlike VMs which need separate management.
WSL provides a more efficient, integrated, and cost-effective solution for running Linux on Windows compared to traditional virtual environments.
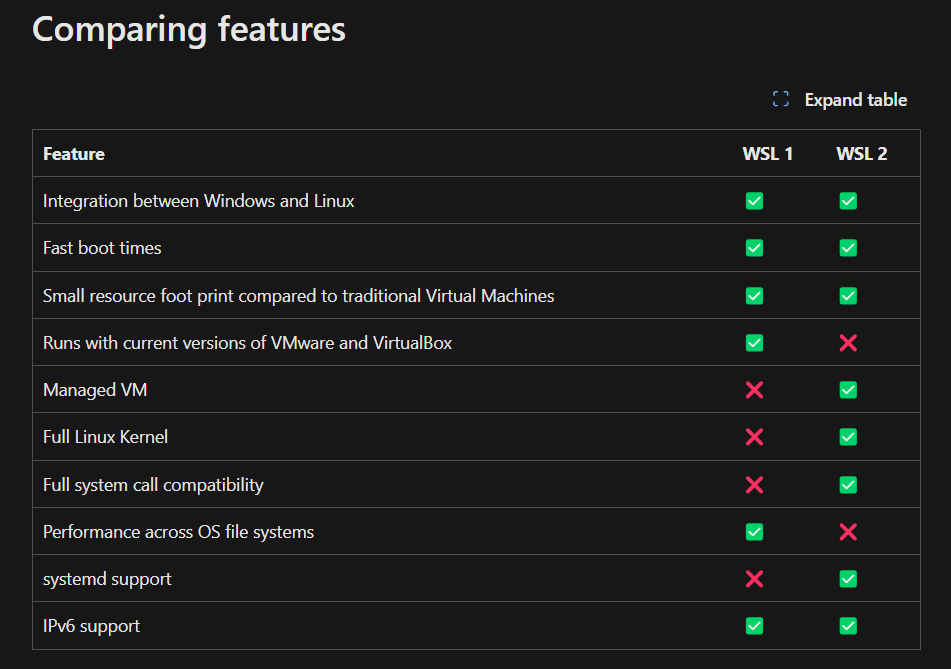
WSL1 vs WSL2
WSL1 and WSL2 are different in several ways:
- WSL1: Uses a translation layer to convert Linux system calls into Windows system calls. It’s lighter but less compatible with certain applications.
- WSL2: Utilizes a lightweight virtual machine with a real Linux kernel, offering better performance and full compatibility with Linux applications and tools.
You can get more details on WSL 1 and WSL 2 and more information about the WSL technology on the Microsoft documentation on the Microsoft website
Prerequisites for WSL
Before diving into installation, it’s crucial to ensure your system is ready for WSL2. Make sure you have:
- Virtualization Technology enabled in your BIOS/UEFI settings.
- Windows Update to the latest version to support WSL2.
- Windows 10 Version 2004 or higher (Build 19041 and above) or recommended Windows 11.
1. Enable Virtualization Technology in BIOS
To run WSL2, virtualization technology must be enabled in your BIOS/UEFI. Here’s how:
- Restart your computer and enter BIOS/UEFI settings (usually by pressing
F2,F10,Delete, orEscduring boot). - Locate the Virtualization Technology option in the BIOS/UEFI menu (often found under CPU settings).
- Enable Virtualization Technology and save your changes.
- Exit BIOS/UEFI and boot back into Windows.
- If that doesn’t work just google how to enable virtualization for your particular system model
2. Enable the WSL Feature in Windows
With virtualization enabled, you need to enable WSL and the Virtual Machine Platform feature: You have two options for that via the Windows control panel or Power Shell
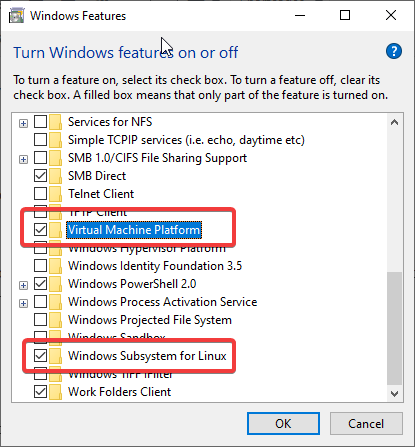
1. Enable the WSL Windows control panel
- Open the Control Panel
- Click Programs
- Click Turn Windows features on or off
- Select Windows Subsystem for Linux
- Click OK
- Wait for the Installation Wizard to finish configuring Windows
- Click Restart now
2. Enable the WSL Using the Power shell
Open PowerShell as Administrator:
- Right-click on the Start menu and select “Windows Terminal (Admin)” or “PowerShell (Admin)”.
Run the following commands:
					dism.exe /online /enable-feature /featurename:Microsoft-Windows-Subsystem-Linux /all /norestart
dism.exe /online /enable-feature /featurename:VirtualMachinePlatform /all /norestart
Restart your computer to apply the changes..
Installing Ubuntu on Windows via WSL
1. Open Command Prompt as Administrator:
- Search for “cmd” in the Start menu, right-click “Command Prompt,” and select “Run as administrator.”
2. Install WSL
wsl --install
3. Wait for the installation to complete. The distribution will be downloaded and installed automatically.
4. Restart your computer to apply these changes.
5. After restart if the installation does not continue open the ubuntu app from your start menu, which should be installed by now.
Installing Kali Linux via Microsoft Store
- Open the Microsoft Store.
- Search for “Kali Linux”. or Click here
- Click “Install” to download and install Kali Linux
If you prefer an alternative installation method read the article on Kali Linux website
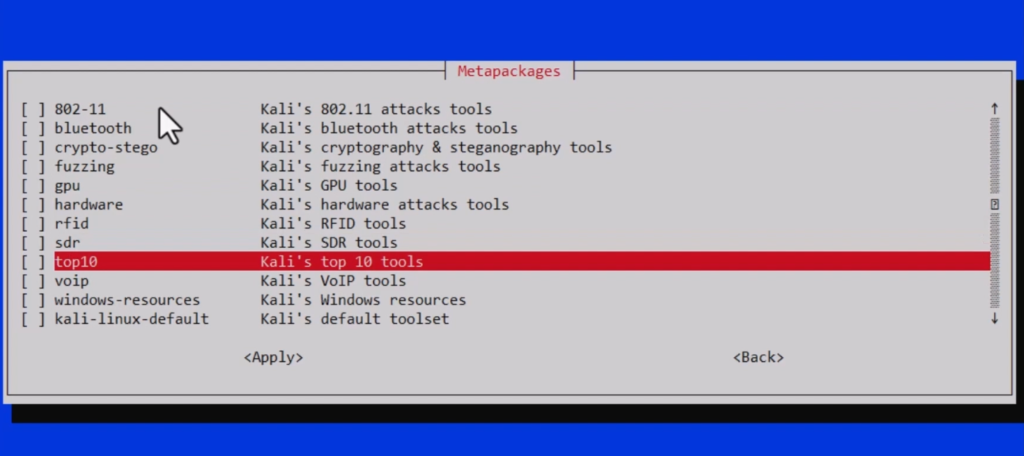
Installing Kali Linux Apps on Windows
- Open Kali Linux from the Start menu.
- Update the package list:
					sudo apt update
kali tweaks
3. Select any package as per your liking and apply changes.
You can also install Kali Linux on the cloud for a free lifetime, Read my article: How to get a Free Kali Linux Cloud PC forever and access it from any device. But for now, let’s continue on to do that on PC.
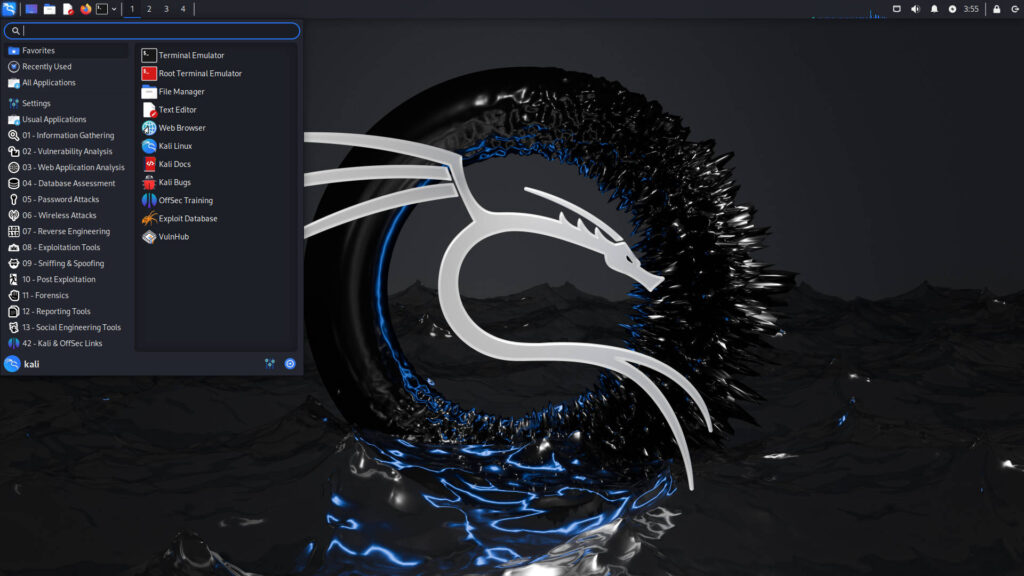
Power of Ubuntu, Kali Linux, Debian and Windows Terminal as One
WSL2 provides a powerful integration of Ubuntu, Kali Linux, and Windows Terminal. Use the Windows Terminal to switch between these environments seamlessly, allowing you to leverage the strengths of each distribution.
Installing Debian in Windows via WSL command
- List available Linux distributions to find Debian:
wsl --list --online
- Install Debian:
wsl --install -d Debian
If you want to install a specific distribution: Replace
<DistributionName>with the name of the distribution you wish to install.
wsl --install -d <DistributionName>
Basic WSL Commands for Management
WSL commands enable you to manage your Linux environments directly from the Windows command line. Here are some useful commands:
- List installed distributions:
wsl -l
- Set default WSL version:
wsl --set-default-version 2
- Switch distributions:
wsl --set-version <DistroName> 2
- To List running WSL instances:
wsl --list --running
- To Stop or Terminate a running instance:
wsl --terminate <DistroName>
- To Uninstall or Unregister a distribution:
wsl --unregister <DistroName>
Installing GUI for Kali Linux on WSL using Kex
- Open the Kali bash and to Install the GUI from Kex Server enter bellow commands
					sudo apt update
sudo apt install kali-win-kex
- Launch kali GUI from bellow command and enter password
kex
Installing GUI for Ubuntu on WSL using xfce
Open Ubuntu bash.
Install the GUI packages:
					sudo apt-get update && sudo apt-get upgrade -y
sudo apt install tasksel
sudo tasksel install ubuntu-desktop
- Create an admin user for the remote session : Create a user for the remote session and provide admin rights. You can replace toffy with your username
					sudo adduser toffy
sudo usermod -aG sudo,adm toffy
- install ubuntu desktop for Xfce and launch Xrdp
					sudo apt install kali-ubuntu-xfce
sudo service xrdp start
sudo /etc/init.d/xrdp start
- check the IP for ubuntu VM
ip ad
- copy IP address and paste in windows remote desktop connection app and enter the username and password you have created

Installing Linux Apps on Windows Directly
You can directly install and launch Linux apps on windows without opening command prompt or GUI VM . Linux apps will word like native app on windows
sudo apt install update
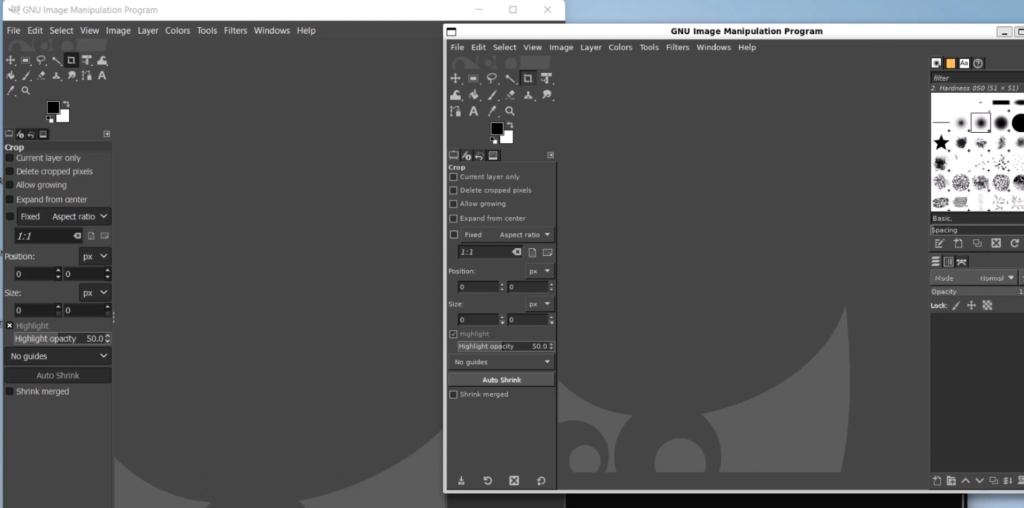
sudo apt install gimp
after installation app should show up in the start menu with the (Linux) label next to it, you can also launch Windows Instant of the same app simultaneously without interruption.
Like I am launching a GIMP for Windows and Linux simultaneously as shown in bellow image.
Conclusions
By following this guide, you’ll unlock the full potential of WSL2, making it easier than ever to integrate Linux tools and environments into your Windows workflow. Enjoy the flexibility and power of running Ubuntu, Kali Linux, Debian, and more, right alongside your Windows applications!