Introduction
Kali Linux stands as the pinnacle of ethical hacking OS, equipped with a plethora of tools for security assessments, penetration testing, digital forensics, and security auditing. Whether you’re a seasoned professional or a curious beginner, Kali Linux offers an unparalleled hands-on learning experience.
In this tutorial, we demonstrate how to set up a Kali Linux virtual machine on the cloud absolutely free, granting you access to a complete GUI environment with a public IP. This means you can harness the power of Kali Linux from any device, anywhere, anytime, without spending a single penny.
We’ll be utilizing the free tier of Oracle Cloud, and we’ll guide you through the process of setting up your OCI account with lifetime free resources, ensuring you have the tools you need for your cybersecurity journey.
Creating Oracle cloud free Account
Oracle cloud provides some Always Free services to its customer in its Oracle Cloud Free Tier. Always Free services are available for an unlimited time. Some limitations apply. As new Always Free services become available, you will automatically be able to use those as well.
After creating a free account on oracle cloud, launch a Kali Linux image from the marketplace of Oracle Cloud by Clicking Here
After creating the VM, Launch the cloud shell provided on the OCI platform . The username and password for VM is Debian
					Username : Debian
Password : Debian
Fixing the Bugs in Oracle Cloud provided Kali Linux Image
Oracle provided Kali Linux image has some bugs and outdated information, We need to fix it before proceeding ahead.
1.Updating expired repo keys bug in OCI Kali
In Oracle provided Kali image one of the repo keys expired as of 2023-01-16. This means that you will have some issues doing updates and/or installing other applications. To check this use bellow command
apt-key list
Example :
					## /etc/apt/trusted.gpg.d/kali-archive-keyring.gpg

pub   rsa4096 2012-03-05 [SC] [expired: 2023-01-16]
44C6 513A 8E4F B3D3 0875  F758 ED44 4FF0 7D8D 0BF6
uid           [ expired] Kali Linux Repository [devel@kali.org](mailto:devel@kali.org)[/devel@kali.org](mailto:/devel@kali.org)
To resolve this add below command
wget -q -O - https://archive.kali.org/archive-key.asc | sudo apt-key add
Now archive keyring should be updated to the latest version.
2. Fixing XRDP bug for logs in Oracle Cloud Kali VM
The OCI Marketplace’s Kali image (V2) comes equipped with all the necessary prerequisites for initiating RDP. However, an issue arises with the present XRDP version upon attempting to launch the XRDP daemon, resulting in failure. This is attributed to the absence of the log file “/var/log/xrdp.log
To resolve this run the following commands:
sudo touch /var/log/xrdp.log
sudo chown xrdp:xrdp /var/log/xrdp.log
sudo systemctl restart xrdp
3. Increasing Virtual memory in VM for stability
For that, get root access by typing this command.
sudo -i
Check the availability of memory, typing this. There is no swap space.
free -m
To add the new swap file paste the following command. This takes some time, wait until you get new lines on the terminal. Don’t try to re-enter it. You will get this output when it is finished.
sudo dd if=/dev/zero of=/mnt/swap.0 bs=5024 count=1048576 && sudo mkswap /mnt/swap.0 && echo "/mnt/swap.0 swap swap defaults 0 0" >> /etc/fstab && swapon /mnt/swap.0 && sudo swapon -s
Recheck the available memory of the server. You can see the swap file added to the system.
free -m
4. Reset existing Super admin account and Password in Kali Linux
The OCI Marketplace’s Kali image (V2) comes with a predefined super admin user Amrita, we need to reset the account for our usage.
To list all the user accounts on Linux using commands.
getent passwd
sudo usermod -l newusername oldusername
Do not forget to replace in above command : newusername and oldusername.
To rest the password , type the passwd command followed by a newusername for which you wish to prompt a password change
passwd newusername
Adding RDP and No Machine port in Oracle firewall
- Select the compartment where you created the new instance.
- In the list of VCNs, select your VCN.
- On the Virtual Cloud Network Details page, click Security Lists in the left pane.
- Select a security list and click Add Ingress Rules to open the Add Ingress Rules dialog.
- Add 3389 port to allow RDP connection for Windows PC.
- Add 4000 port to allow No Machine connection for Windows / Android/iPhone /MAC/ Linux OS.
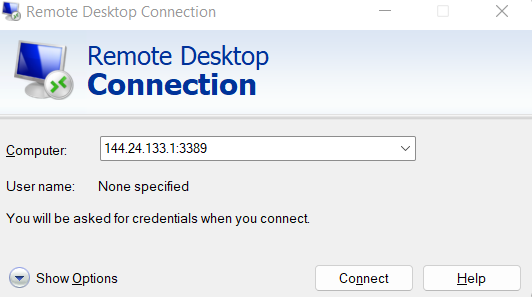
Connecting Kali Linux using Windows RDP
Open the RDP app on Windows machine and type the VM IP along with port no 3389 click connect to start the remote connection session using the XRDP desktop
Installing No Machine in Kali VM
No Machine will allow connection for our Kali Linux VM from any Windows / Android/iPhone /MAC/ Linux OS. To install use the following Command.
					sudo -i
sudo apt install tasksel
sudo tasksel install
Create a user for the remote session and provide admin rights. You can replace toffy with your username
					sudo adduser toffy
sudo usermod -aG sudo,adm toffy
To make this, even more, widely available we use No machine remote desktop to use our VM without using ssh and without tunneling Install No machine
sudo wget https://download.nomachine.com/download/8.11/Linux/nomachine_8.11.3_4_amd64.deb
sudo dpkg -i nomachine_8.11.3_4_amd64.deb
sudo reboot
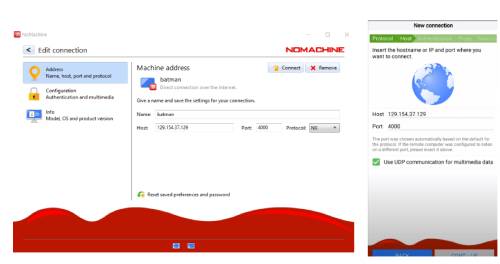
Download and install No Machine and acces the VM using desktop and Mobile device
Download and install NoMachine in your desired devices Like PC or mobile device
You can download No machine from here Download Nomachine
Add the VM public IP in nomachine as shown in the picture below. You can keep the rest of the setting as default