Table of Contents
Introduction: Break Free from Expensive Automation Tools
Are you tired of paying hefty monthly subscriptions for automation tools like Zapier and Make.com? While these platforms are powerful, their costs can skyrocket when you need advanced features – sometimes reaching astronomical figures that would make Elon Musk’s rocket launches seem affordable by comparison. But what if you could build your own n8n automation tool completely free, running on the cloud for a lifetime?
This comprehensive guide will show you how to transform yourself into your own “Iron Man” with a custom automation platform that rivals paid services while costing you absolutely nothing.
What is n8n and Why Should You Choose It?
n8n (pronounced “n-eight-n”) is an open-source workflow automation platform that serves as a central hub where all your apps and services connect seamlessly. Think of it as digital duct tape for the entire internet – connecting disparate systems to make your life easier.
Key Advantages of n8n Over Paid Alternatives:
Cost-Effective Solution: Unlike Zapier’s pricing structure that charges per operation, n8n charges per workflow execution, making it significantly more economical for complex automation scenarios. For some automations, n8n can be 1000 times more cost-efficient compared to Zapier or Make.
Self-Hosting Capabilities: The community edition allows you to self-host on your own infrastructure, giving you complete control over your data and eliminating ongoing subscription costs.
Advanced Customization: n8n offers unlimited workflow executions on self-hosted instances and supports advanced code nodes, branching logic, and custom integrations that paid platforms often restrict.
No Premium App Restrictions: Unlike competitors, n8n doesn’t charge extra for “premium” app integrations, giving you access to all connectors without additional fees.
Advanced AI Integration Capabilities
One of n8n’s most powerful features is its AI integration capabilities. You can:
Connect to any LLM service (Google Gemini, OpenAI, Anthropic, local models)
Build multi-agent systems with visual workflows
Implement intelligent data processing with AI-powered nodes
Create custom AI assistants that integrate with your existing tools
This positions your self-hosted n8n as a powerful AI workflow automation platform that can compete with expensive enterprise solutions.
Cost Comparison: Self-Hosted vs. Cloud Services
| Service | Monthly Cost | Workflow Limit | Advanced Features |
|---|---|---|---|
| Self-Hosted n8n | $0 | Unlimited | All included |
| Zapier Professional | $49 | 10,000 tasks | Limited |
| Make.com Pro | €50 | 10,000 operations | Restricted |
| n8n Cloud Starter | $20 | 2,500executions | Basic |
Setting Up Your Forever-Free Cloud Infrastructure
Why Oracle Cloud Free Tier?
Oracle Cloud’s “Always Free” tier provides genuinely free resources that include:
4-core ARM-based VMs with 24GB total RAM
200GB of block storage
10GB of object storage
No time limits on these resources
This generous allocation is perfect for hosting n8n permanently without any recurring costs.
Highly recommend you to create a free account on oracle cloud click here for details.
Oracle Cloud Free Tier website: click here
Cheap VPS for n8n hosting : Click Here
Prerequisites for Installation
Before diving into the installation process, ensure you have:
Oracle Cloud free account (if you don’t have one yet)
Basic terminal/command line knowledge
PuTTY or similar SSH client for Windows users
Domain management access (we’ll use free dynamic DNS services)
Step-by-Step Installation Guide
Step 1: Creating Your Virtual Machine
Create Oracle Cloud VM Instance:
Navigate to Oracle Cloud Console
Click “Create VM Instance”
Configure the instance:
Name: Choose a memorable name (e.g., “n8n-automation-server”)
Image: Ubuntu 24.04 (recommended for stability)
Shape: Use the free ARM-based compute
SSH Key: Generate and upload your public key
Configure SSH Access:
Generate SSH key pairs using PuTTY Key Generator for secure access to your server.
Step 2: Server Preparation and Security
- Update System Packages:
					# Update all existing software
sudo apt update && sudo apt upgrade -y

# Install common tools we’ll need
sudo apt install -y curl wget git vim build-essential

#Reboot System
sudo reboot
2. Set Up a Basic Firewall
					# Install firewalld
sudo apt install -y firewalld

# Start and enable it so it survives reboots
sudo systemctl enable --now firewalld

# Open web ports 80 (HTTP) and 443 (HTTPS)
sudo firewall-cmd --permanent --zone=public --add-port=80/tcp
sudo firewall-cmd --permanent --zone=public --add-port=443/tcp

# Open n8n’s internal port (we’ll close it later)
sudo firewall-cmd --permanent --zone=public --add-port=5678/tcp

# Apply the changes
sudo firewall-cmd --reload
Don’t forget to configure Oracle Cloud’s security lists to allow these ports through the cloud firewall as well.
Step 3 : Domain Setup with Free Dynamic DNS
Since we’re building this completely free, we’ll use dynamic DNS services instead of purchasing a domain.
For a Cheap domain, you can buy from any provider, and also from Hostinger, as it provides 1-year discount for the first year if you go for a 3-year domain.
Recommended Free Dynamic DNS Providers:
DuckDNS: Simple, unlimited hosts, no ads
No-IP: User-friendly but requires 30-day confirmation
Dynu: Clean interface, multiple hostnames, no monthly confirmation
For this guide, we’ll use Dynu due to its reliability and lack of monthly confirmations:
Create account at dynu.com
Add new hostname (e.g., yourname.mywire.org)
Point it to your Oracle Cloud VM’s public IP
Test DNS resolution:
ping yourname.mywire.org
Step 4 : n8n Installation and Configuration
- Install Docker & Docker Compose
					Add Docker’s GPG key
curl -fsSL https://download.docker.com/linux/ubuntu/gpg | \
  sudo gpg --dearmor -o /usr/share/keyrings/docker-archive-keyring.gpg

# Add the Docker repository
echo \
"deb [arch=amd64 signed-by=/usr/share/keyrings/docker-archive-keyring.gpg] \
 https://download.docker.com/linux/ubuntu $(lsb_release -cs) stable" | \
 sudo tee /etc/apt/sources.list.d/docker.list > /dev/null

# Install Docker Engine
sudo apt update
sudo apt install -y docker-ce docker-ce-cli containerd.io

# Allow your user to run Docker without sudo (log out/in afterward)
sudo usermod -aG docker $USER

# Install Docker Compose (latest version at the time of writing)
sudo curl -L "https://github.com/docker/compose/releases/download/v2.20.0/docker-compose-$(uname -s)-$(uname -m)" \
  -o /usr/local/bin/docker-compose
sudo chmod +x /usr/local/bin/docker-compose

# Check versions
docker --version
docker-compose --version
2. Create the n8n Project Directory
					# Make a folder to hold everything
sudo mkdir -p /opt/n8n
sudo chown $USER:$USER /opt/n8n
cd /opt/n8n
3. Generate a Secure Encryption Key
					# This makes a random 32-character key
openssl rand -base64 32
# Copy the output; you’ll paste it in the next step.
4. Create the Environment File
nano .env
Paste the following, changing the Domain name to your domain: YOURDOMAIN.DYNU.COM , and configuration as per your requirement
					# ---------- BASIC ----------
DOMAIN_NAME=YOURDOMAIN.DYNU.COM
N8N_HOST=YOURDOMAIN.DYNU.COM
WEBHOOK_URL=https://YOURDOMAIN.DYNU.COM/

# ---------- PORTS ----------
N8N_PORT=5678
N8N_PROTOCOL=https
NODE_ENV=production

# ---------- DATABASE ----------
POSTGRES_DB=n8n
POSTGRES_NON_ROOT_USER=n8n
POSTGRES_NON_ROOT_PASSWORD=StrongDbPass123
POSTGRES_USER=root
POSTGRES_PASSWORD=RootDbPass456

# ---------- SECURITY ----------
N8N_ENCRYPTION_KEY=YOUR SECURITY KEY
Save & exit (in Nano: Ctrl + O, Enter, Ctrl + X).
5. Create docker-compose.yml
nano docker-compose.yml
Save & exit (in Nano: Ctrl + O, Enter, Ctrl + X).
5. Create docker-compose.yml
					version: "3.8"

services:
  postgres:
    image: postgres:13
    restart: always
    environment:
      POSTGRES_DB: ${POSTGRES_DB}
      POSTGRES_NON_ROOT_USER: ${POSTGRES_NON_ROOT_USER}
      POSTGRES_NON_ROOT_PASSWORD: ${POSTGRES_NON_ROOT_PASSWORD}
      POSTGRES_USER: ${POSTGRES_USER}
      POSTGRES_PASSWORD: ${POSTGRES_PASSWORD}
    volumes:
      - postgres_data:/var/lib/postgresql/data
      - ./init-data.sh:/docker-entrypoint-initdb.d/init-data.sh
    healthcheck:
      test: ["CMD-SHELL", "pg_isready -U ${POSTGRES_USER} -d ${POSTGRES_DB}"]
      interval: 5s
      retries: 10

  n8n:
    image: n8nio/n8n
    restart: always
    ports:
      - "5678:5678"
    environment:
      - DB_TYPE=postgresdb
      - DB_POSTGRESDB_HOST=postgres
      - DB_POSTGRESDB_PORT=5432
      - DB_POSTGRESDB_DATABASE=${POSTGRES_DB}
      - DB_POSTGRESDB_USER=${POSTGRES_NON_ROOT_USER}
      - DB_POSTGRESDB_PASSWORD=${POSTGRES_NON_ROOT_PASSWORD}
      - N8N_HOST=${N8N_HOST}
      - N8N_PORT=${N8N_PORT}
      - N8N_PROTOCOL=${N8N_PROTOCOL}
      - WEBHOOK_URL=${WEBHOOK_URL}
      - N8N_ENCRYPTION_KEY=${N8N_ENCRYPTION_KEY}
      - NODE_ENV=${NODE_ENV}
    volumes:
      - n8n_data:/home/node/.n8n
    depends_on:
      postgres:
        condition: service_healthy

volumes:
  postgres_data:
  n8n_data:
Save & exit (in Nano: Ctrl + O, Enter, Ctrl + X).
6. Add the Database Init Script
nano init-data.sh
Paste :
					#!/usr/bin/env bash
set -e
psql -v ON_ERROR_STOP=1 -U "$POSTGRES_USER" -d "$POSTGRES_DB" <<-EOSQL
  CREATE USER $POSTGRES_NON_ROOT_USER WITH PASSWORD '$POSTGRES_NON_ROOT_PASSWORD';
  GRANT ALL PRIVILEGES ON DATABASE $POSTGRES_DB TO $POSTGRES_NON_ROOT_USER;
EOSQL
Save & exit.
					# Make it executable
chmod +x init-data.sh
7. Start n8n
					sudo docker-compose up -d
# View logs until you see “Web server listening…” then Ctrl+C
sudo docker-compose logs -f n8n
8. Install Nginx as a Reverse Proxy
					sudo apt install -y nginx
sudo nano /etc/nginx/sites-available/n8n
Paste:
					server {
    listen 80;
    server_name YOURDOMAIN.DYNU.COM;
    return 301 https://$server_name$request_uri;
}

server {
    listen 443 ssl http2;
    server_name YOURDOMAIN.DYNU.COM;
    ssl_certificate /etc/letsencrypt/live/YOURDOMAIN.DYNU.COM/fullchain.pem;
    ssl_certificate_key /etc/letsencrypt/live/YOURDOMAIN.DYNU.COM/privkey.pem;


    location / {
        proxy_pass http://localhost:5678;
        proxy_http_version 1.1;
        proxy_set_header Upgrade $http_upgrade;
        proxy_set_header Connection "upgrade";
        proxy_set_header Host $host;
        proxy_set_header X-Forwarded-Proto $scheme;
        proxy_set_header X-Real-IP $remote_addr;
        proxy_set_header X-Forwarded-For $proxy_add_x_forwarded_for;
    }

    client_max_body_size 16M;
}
Save & Exit.
					# Enable the site
sudo ln -s /etc/nginx/sites-available/n8n /etc/nginx/sites-enabled/
sudo nginx -t       # Check syntax
sudo systemctl restart nginx
Reboot :
sudo reboot
9. Generate the SSL certificates:
Run Certbot to create the SSL certificates for your domain and automatically update nginx config:
					# Install Certbot
sudo apt install -y certbot python3-certbot-nginx

# Request a free certificate (replace domain)
sudo certbot --nginx -d YOURDOMAIN.DYNU.COM

# Test automatic renewal
sudo certbot renew --dry-run
Follow the prompts to verify domain ownership and complete certificate issuance.
If the nginx plugin fails due to existing config errors: nginx trouble shooting Commands
Temporarily move or rename your current nginx site config to avoid conflicts:Test nginx configuration:
sudo mv /etc/nginx/sites-enabled/n8n /etc/nginx/sites-enabled/n8n.backup
Run Certbot with standalone mode to generate certificates without nginx integration: change your domain: yourdomain.mywire.org
sudo certbot certonly --standalone -d yourdomain.mywire.org
Once certificates are generated, restore your nginx config:
sudo mv /etc/nginx/sites-enabled/n8n.backup /etc/nginx/sites-enabled/n8n
sudo nginx -t
Make sure it says “syntax is ok”.
Start or reload nginx:
					sudo systemctl start nginx
# or if it's already running
sudo systemctl reload nginx
10. Close the Direct n8n Port
					# Remove port 5678 from firewall
sudo firewall-cmd --permanent --zone=public --remove-port=5678/tcp
sudo firewall-cmd --reload
11. Verify Everything
Access n8n Interface:
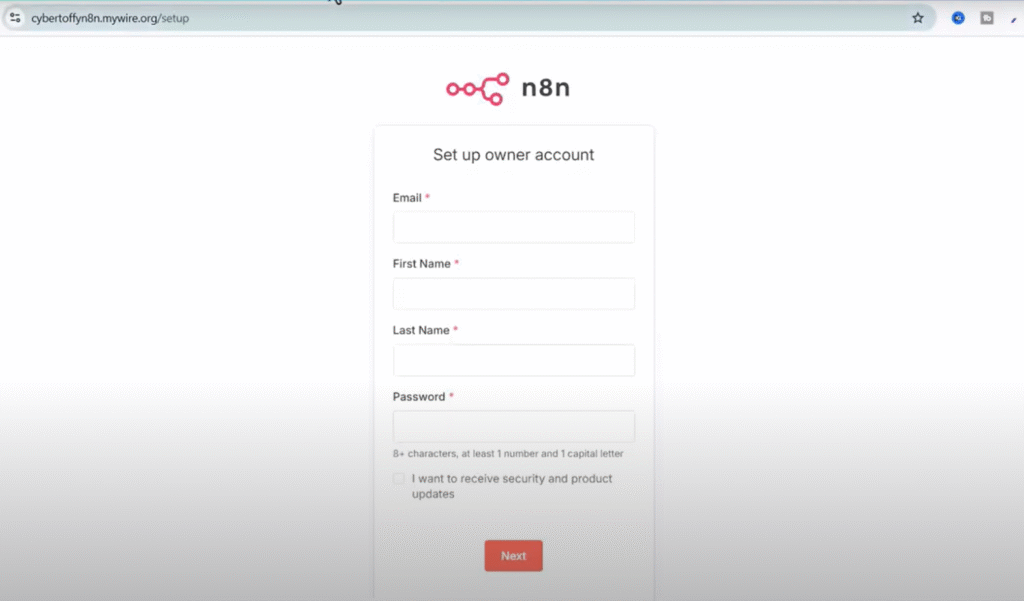
Navigate to https://YOURDOMAIN.DYNU.COM in your browser. You should see the n8n setup screen.
Create Admin Account:
Set up your owner account with email and password
Complete the initial configuration wizard
Activate Community Edition License: Check your email for the free license key and enter it in Settings > Usage and Plan
Unlocking Additional Features
The n8n community edition includes almost all features of the paid version. By registering your installation, you unlock additional capabilities:
Workflow folders for better organization
Debug in editor functionality
24 hours of workflow history
Custom execution data management
These features activate immediately and never expire
Sign up owner accounts page and activate the n8n license with the license key sent to your email.

Security Best Practices
Remove Temporary Ports:
After confirming everything works properly, remove the temporary port 5678:
Regular Updates:
Keep your system and Docker containers updated regularly for security.
Backup Strategy:
Implement regular backups of your n8n database and configuration files.
Troubleshooting Common Issues
Docker Permission Errors: Ensure your user is added to the docker group and restart your session.
SSL Certificate Issues: Verify your domain points to the correct IP address and ports 80/443 are open.
Database Connection Problems: Check your environment variables and ensure PostgreSQL container is running properly.
Conclusion: Your Gateway to Unlimited Automation
By following this comprehensive guide, you’ve successfully created a powerful, self-hosted automation platform that rivals expensive commercial solutions. Your n8n installation on Oracle Cloud provides:


This setup transforms you into the “Iron Man” of automation – with your own personal JARVIS running in the cloud, ready to automate your digital world without any ongoing costs.
Ready to expand your automation empire? Your n8n installation is just the beginning. In the next phase, you can explore building custom AI agents, integrating with home automation systems, and creating sophisticated multi-step workflows that would cost hundreds of dollars monthly on commercial platforms.
The power of unlimited automation is now in your hands – completely free, forever.
This guide is part of a comprehensive series on building your own AI automation infrastructure. Stay tuned for advanced tutorials on creating custom AI agents and integrating with smart home systems.


