In an age of increasing surveillance and diminishing privacy, tools like the TOR (The Onion Router) network offer a lifeline for secure and anonymous communication. TOR relies on a decentralized network of volunteer-operated relays to maintain its security and anonymity. This guide explains how you can set up your own onion relay, strengthen the TOR ecosystem, and contribute to global privacy protection.
Why Does the TOR Network Need Relays?
TOR achieves anonymity by routing internet traffic through multiple relays before reaching its destination. These relays ensure that no single node can fully trace the communication. However, a centralized relay system poses risks. If a single organization controls a significant number of relays, it could compromise the entire network’s security. For this reason, decentralization is key, and volunteers worldwide are encouraged to run relays.
Types of TOR Nodes
- Entry Node (Guard): The first relay where encrypted traffic enters the network.
- Middle Node: An intermediary point where traffic is further encrypted.
- Exit Node: The final relay where traffic leaves the network to reach the destination. Exit nodes are more vulnerable to misuse, so they require cautious management.
For most contributors, running a middle or guard node is recommended over an exit node due to lower risks and technical requirements.
The Tor Project actively monitors and addresses malicious relays to maintain the network’s integrity and user safety. Malicious relays can perform man-in-the-middle attacks, compromising user anonymity. To combat this, the Tor Project has developed criteria and processes for identifying and removing such relays, involving collaboration with directory authorities—trusted volunteers who maintain the list of active relays. A notable case was the “KAX17” incident, where a single operator added numerous suspicious relays over months. These relays were eventually removed through vigilant monitoring and community reports, highlighting the ongoing efforts to protect the network.
You can read the full article on the Tor Project’s blog for more detailed information. Sources
Setting Up Your Own Onion Relay
The process of setting up an onion relay can be broken into a series of manageable steps:
1. Understanding the Requirements
- Operating System: Use Linux-based systems like Ubuntu 24.04 for maximum compatibility.
- Cloud Provider: Platforms like Oracle Cloud offer free resources suitable for running TOR relays.
- Bandwidth: Ensure your internet connection has sufficient bandwidth; TOR recommends a minimum uptime of 2 hours daily.
Detailed technical requirements are available on tor website click here
2. Preparing Your Environment
- Create the ubuntu vm on your cloud provider
- Update Your System: Always keep your system updated for security and compatibility.bash
sudo apt-get update && sudo apt-get upgrade -y
3. Enable Automatic Updates:
Install and configure unattended-upgrades to ensure security patches are applied regularly.
					#install unattended upgrades
sudo apt-get install unattended-upgrades apt-listchanges
#open the config file in nano
sudo nano /etc/apt/apt.conf.d/50unattended-upgrades
Remove the bellow config from the file:
					#add this config
Unattended-Upgrade::Allowed-Origins { "${distro_id}:${distro_codename}-security"; "TorProject:${distro_codename}"; }; Unattended-Upgrade::Package-Blacklist { };
Unattended-Upgrade::Automatic-Reboot "true";
Edit another file
sudo nano /etc/apt/apt.conf.d/10periodic
Clear everything and enter bellow
					APT::Periodic::Update-Package-Lists "1";
APT::Periodic::AutocleanInterval "5";
APT::Periodic::Unattended-Upgrade "1";
APT::Periodic::Verbose "1";
Test Unattended upgrades
sudo unattended-upgrade --debug
4. Install TOR
Add Official TOR Repositories
					#Install prereqs
apt install apt-transport-https
Find your Debian version (My VM version is trixie)
cat /etc/debian_version
Create a new sources file
sudo nano /etc/apt/sources.list.d/tor.list
Add bellow two repositories
*replace {trixie} with your Debian version*
					deb [signed-by=/usr/share/keyrings/tor-archive-keyring.gpg] https://deb.torproject.org/torproject.org trixie main
deb-src [signed-by=/usr/share/keyrings/tor-archive-keyring.gpg] https://deb.torproject.org/torproject.org trixie main
Get into the root to add GPT keys
sudo -i
Add the GPG Key
wget -qO- https://deb.torproject.org/torproject.org/A3C4F0F979CAA22CDBA8F512EE8CBC9E886DDD89.asc | gpg --dearmor | tee /usr/share/keyrings/tor-archive-keyring.gpg >/dev/null
Install TOR
sudo apt update apt install tor deb.torproject.org-keyring
5. Configure TOR
Open the TOR Configuration File
sudo nano /etc/tor/torrc
Add the following config
					Nickname    myNiceRelay  # Change "myNiceRelay" to something you like
ContactInfo your@e-mail  # Write your e-mail and be aware it will be published
ORPort      443          # You might use a different port, should you want to
ExitRelay   0
SocksPort   0

# Bandwidth
## The config below has a maximum of 1TB
## (up/down) per month, starting on the 1st midnight
AccountingMax 1 TB
AccountingStart month 1 00:00
## Monitoring
ControlPort 9051
CookieAuthentication 1
6. Enable TOR and Restart
Add the following config
					sudo systemctl enable tor
sudo systemctl restart tor
Install Monitoring :
Monitoring ensures your relay operates smoothly:
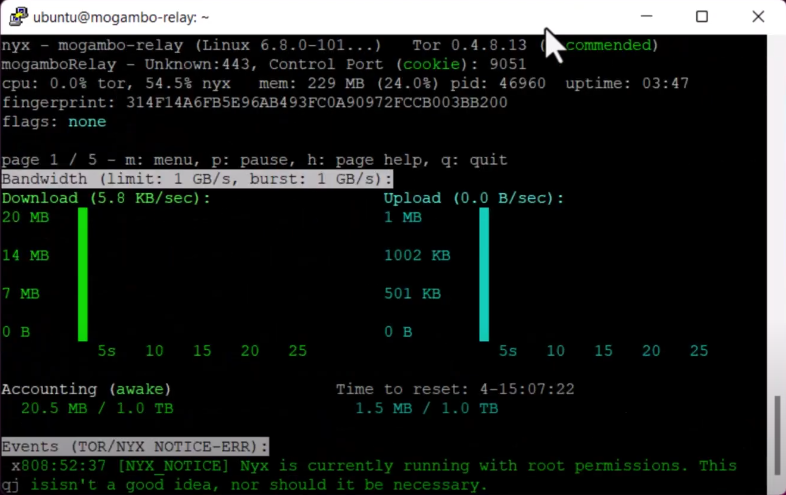
Install Nyx, a TOR network monitoring tool:
					## Installing Nyx
sudo apt install nyx
## Run Nyx
sudo nyx
Nyx provides a graphical representation of your relay’s performance, including bandwidth usage, active connections, and relay status.

Building Your Relay’s Reputation
New relays undergo a probationary period before gaining full trust in the network. TOR measures factors such as uptime, bandwidth, and reliability to assign roles like Guard or Stable. Consistently maintaining your relay can elevate its status, making it a critical part of the TOR infrastructure.
A new Tor relay undergoes four key phases before becoming fully integrated into the network:
Unmeasured Phase (Days 0-3): Upon activation, the relay performs a self-test to estimate its bandwidth, initially receiving minimal traffic due to a conservative bandwidth cap.
Remote Measurement Phase (Days 3-8): Bandwidth authorities (bwauths) conduct active measurements, adjusting the relay’s consensus weight based on performance, leading to a gradual increase in traffic.
Ramp-Up Guard Phase (Days 8-68): The relay’s traffic may fluctuate as it is evaluated for guard status, a role that involves handling the first hop in client connections.
Steady-State Guard Phase (Day 68+): If deemed stable and reliable, the relay attains guard status, resulting in a consistent and significant traffic load.
This progression ensures that only trustworthy and high-performing relays become integral parts of the Tor network, maintaining its security and efficiency.
Contributing to Global Privacy
By setting up a relay, you play a vital role in ensuring free access to information and protecting online privacy. Whether for journalists, activists, or everyday users, your relay helps safeguard anonymity and freedom in an increasingly monitored world.


